Showing posts with label walnut. Show all posts

Friday, June 25, 2010

New people, places & directions

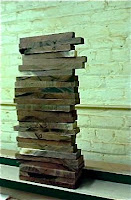
This afternoon I spent a couple hours squaring the edges of several planks of hackberry that I brought back from my most recent visit to Silver Creek Sawmill in Iowa. These boards, along with legs cut from the thickest plank of walnut I've ever seen, will eventually come together as a conference table for my new friend Jessica, owner of Birdhouse Interior Design. I had the pleasure of meeting Jessica a couple months ago, having followed her and the development of her business on Twitter for a while. Our ideas about design and affordability seem to mesh pretty well and I'm excited to work with her as she takes her business to the next level.

Jessica's new digs - and the conference table's new home - will be a beautifully lit parcel in the space formerly occupied by the Mastercraft Furniture Company, and which also houses the new CAMP Coworking Space. Am I jealous? Um, yes. It's exciting to see so many creative people working around each other, moving their ideas and passions forward.

Here's a simple drawing of the basic table design, sans an element that will add some additional color, contrast and life to the piece to tie it all together.

This table is particularly exciting for me because it is a shift in direction and technique. The planks that make up the top will join to one another a various angles. The legs will be tapered and rounded by hand on one corner to match the contour of the top.  I'm also trying a new technique that will include using cast resin. More on that later.

Friday, April 23, 2010

Vinyl Lives! Jason's LP cabinet finished

I started a fancy two-tiered combination record cabinet and turntable holder for my client, Jason, a few weeks ago. I was thrilled to deliver it completed, along with a little bonus LP, earlier this week. Since I'm an avid record collector, I had a blast making this cabinet and hope I get a chance to make some others similar to this one. Maybe I'll even have time one day to make one for myself.
From my original design, I couldn't resist making a couple changes and embellishments. First, I traded out the proposed paper strap door pulls and handles for a set I hand-turned from canarywood. They're likely to last a little longer, especially since they'll be in arms reach of an adventurous 2-year-old. I also inlayed a single star pattern in the top of the lid that's similar to the tables and other pieces I've been making recently.


The project also created several challenges for me; namely the compound angles I had to cut and join to create the top. I also learned that next time I make something like this, I should try to make the top a little lighter (it's kind of a beast).

Each tier of the cabinet holds around 75 - 100 12-inch LPs, which should be plenty of space for Jason to expand his collection.

Sunday, April 4, 2010

Jason's Record Cabinet: In Process

As some of you may be aware, I'm kind of a vinyl junkie. I've built up a sizeable collection of LPs and 45s over the past 10 years. However, I've never taken the opportunity to build myself a cabinet worthy of its would-be contents. My friend and client Jason, however, is going to have a nice cabinet for his collection very soon.

The below image is a simple drawing that I'm using as a basis for building Jason's cabinet. I'm in the process right now, and am really enjoying building it knowing it'll be in someone's home who I think is really cool, and will house something that I have such a strong appreciation for.


The cabinet is constructed of walnut and comes as a two-piece set. The top section includes a beveled, hinged lid that, when opened, will reveal Jason's turntable. There will also be a display rack attached to one side that will serve a dual function of holding and highlighting the jacket of the record in use. I like to think of that feature as the home stereo version of a cranky record store clerk's "Now Playing" rack. Underneath that will be a shelf with doors that will hold about a crate's worth of LPs. The lower section is a similarly sized shelf unit. I'm flirting with using paper as a structural element again with this piece, proposing to use it as the handles for the doors and top.

A feature that doesn't come through the drawing is the beautifully figured walnut in the photo to the right. The spirally, funnel grain pattern will be incorporated into the doors.

I can already tell this is shaping up to be the kind of project that's hard to give up.

Wednesday, July 8, 2009

Clean Plate table sneak peak


I celebrated the majority of the July 4th holiday by not hanging out with friends and family; not relaxing in lawn chairs; and not blowing myself up with black cats and M-80s. I did, however, witness a pretty impressive fireworks display in the 2500 block of S. 49th St.

Most of my weekend was in fact spent on my back screwing... boards that is. I took advantage of an extra day off work to finish fabricating the first part of the Clean Plate table. I affixed the side rails to the 4 gorgeous solid walnut legs and created a sort of interior skeletal structure from poplar (a very straight-grained, durable wood).

I joined enough planks to create a full top that screws onto the structure from the underside of the table. In the picture at right, I'm using bar clamps to join the pieces laterally, and squeeze clamps to keep the board from buckling upward under the immense pressure of the clamping. This will also ensure that the piece will remain a flat surface after the glue dries.

Drilling up through the poplar structure into the underside of the planks will accommodate any expansion or contraction that may result from changes in temperature and humidity; this also makes the top look like it's resting on the legs and side rails, without any fasteners, which is a "cleaner" look.

The next phase will involve a pretty extensive amount of sanding on the top. This is the part of working with wood that I wish I didn't have to do. Not only is it hard, tiring work; it's also very dirty and not particularly good for one's health. I wear a professional respirator (those paper masks are worthless, btw), but still come home with nostrels full of brown dust and my eyes feeling slightly irrirated, like I'm wearing contact lenses that are past their expiration date. It's worth the work and risk to health - check out the contrast in the richness of the section of wood that has been sanded and coated with linseed oil and the section that has not - it's pretty dramatic and makes me excited to see how the top will look when finished. Hopefully that happens by the end of the week. Time is running short... Elle starts the move-in to Empty Room August 1.

Friday, June 26, 2009

Clean Table - Sneak Peak #3: It's turning me upside down


After a short break to travel to San Francisco for work/play, I was able to get back in my workshop today. I made some pretty substantial progress on the Clean Plate table, including getting all the top planks cut to size, as well as the rails and ends for one of the 3 components. 

The picture on the left is one of two five-foot long sections laid out on a work table. It's pictured here upside down, because the pieces are not fasted together in any way. Hopefully you can get a sense of the basic design and size from the photo. 

This 5' x 4' section and another of equal dimension will bookend a middle section that is 4' x 4'. Two legs of each of the outer 5' x 4' sections will pull double duty by supporting the middle section
as well. I wish I had a better picture of the way I've arranged the top planks; the richness of color and diversity of grain patterns of this Silver City, IA and Nebraska-grown and milled walnut is significant.

To give you a larger sense of the amount of material in this table (and then, perhaps the size),
here is a shot of most of the end pieces I cut off today to square and cut to size the top planks. I save all these stubby pieces in a box with the intent of making a sculpture or fabricating a structure, but I'm not convinced this will happen any time soon. We'll see - maybe when I finish this, and another project and some chairs and...

Wednesday, June 3, 2009

Niz's side table

My girlfriend fiancee, Niz, has a slightly different aesthetic than mine when it comes to furniture and interiors. For the most part, I like very solid, dark flooring, molding and furniture. She's sort of the opposite; I think she'd like to live in the Ikea showroom. I think she almost fainted when she saw the custom walk-in closet and cabinets my friend Doug K. made for he and his wife's house.

So, in my continued quest to make her happy, I decided I'd try to move outside my craft comfort zone and make something Ikea-worthy. It's not exactly an Ikea knock-off - that would go against my principal about copying, etc. - but I think I've channeled the simplicity in its use of plywood and veneer and relatively simple design. All in all, I'm pretty happy with this one. The top is made of 5/8" plywood that is about 12" in diameter. The legs are about 16" tall - also made of 5/8" plywood. The top surface is veneered in cherry, and the legs are veneered in walnut. It took all my willpower to keep the edges exposed, as I generally look at plywood with disdain. However, finally taking the time to make something sort of nice out of it might have converted me somewhat. It probably cost about 1/2 to 1/4 the price in materials to make this piece in plywood/veneer rather than solid hardwood, and plywood is a "greener" materials, sort of.