Showing posts with label woodturning. Show all posts

Friday, December 4, 2009

Fall & Winter Stars - 2 Experimental Tables

Before my friend Doug and I got rolling on the Organic Chair in November, most of my attention was concentrated on further exploring the repetitive, geometric technique I developed while working on my "Ark" chair. The two tables shown below are inspired by the recent transitions to Fall and Winter, respectively, and both follow the same symmetrical, 45-degree angle model. However, with these pieces, I concentrated on the star pattern that naturally emerges when using triangular-shaped pieces.


The tops of both these pieces might be the first thing that catches peoples' eyes, and I'm happy the fabrication of each worked out as well as it did with the number of variables presented with using so many pieces for each. They were somewhat tedious and time consuming to put together, but the base and legs for each proved much more challenging to put together. I should quickly mention that the fabrication process for the tops of each are not "inlay" as several people have commented. They're not stained either; the colors you see are the natural colors of the woods (mostly walnut, paduak, canarywood and redheart), with only a topcoat of semi-gloss polyurethane. Inlay involves insetting thin, non-geometric (marquetry) or geometric (parquetry) shapes into another surface. These star tables are made by putting together hundreds of individual diamond-shaped pieces.

But back to the base and legs. These were more challenging - particularly the curvy orange (made of paduak) and yellow (made of canarywood) turned ones.


In the picture on the right side, you might be able to see a curved cut mark near the foot of each one. These wrap around each leg, again in a pattern, and were partly the result of an accident. I'm not sure if this is a common occurance of more seasoned woodturners, but I often get a lot of splintering near the top and bottom of my stock. In an attempt to combat this, I started off by cutting a 45-degree angle around the stock near the top, thinking this would preempt any splintering that normally occurs. As I was turning the area around the cut, I noticed a rounded, petal-like form emerging. This did fix my splintering problem, but also resulted in an innovative form that further highlights the botanical spirit of the whole piece.

Next up, I'm going to try to make a massive form using this pattern technique. My dad, who is much better than I am with math, reminded me that the angle of cut of the triangular/diamond shaped pieces would determine the number of points on similarly star-shaped fabrications: 60-degrees = 6-sided; 45-degrees = 8-sided; 30-degrees = 12-sided; etc. So next up, I'm tackling a project that will use a combination of 60- & 30-degree pieces. But this time, I want to make something that has a rounded or wavy top surface. Any fellow woodworkers, artists, designers or math whizzes out there who can help?

Tuesday, July 21, 2009

Turning you on: An (over) simplified process for using a lathe

Last week I posted a couple pictures of an in-process project that involved making some display cases with spindles. Now that I've finished that project and caught up with (most) of my July work, I thought it would be both informative and cool to show some of the simple process for producing a spindle on a lathe. In doing so, I've omitted several pictures to get to the fun stuff (isn't that what we all want?). Check it:

Step 1) Cut a length of wood that is straight and square on the ends. If it isn't square when you start the lathe, you'll cause yourself irritation and potential eye injury trying to get it centered. If you've ever done ceramics, this process is very similar to centering the mound of clay on the wheel, except that if you don't do it right, you can't just remound the material - you'll waste an expensive piece of wood a tree died to give you. You might not think it, but the harder the wood, the easier it is too turn; soft wood chips and tears more easily, perhaps because the grain/wood fibers are not as tightly bound to one another. Generally, harder woods (maple, walnut, cherry) are much more expensive than softer woods (pine). Actually, come to think of it, perhaps leafy tree wood is softer than coniferous wood - something to think about at a later date... back to getting lathed:

When you have a length of wood that is square on both ends, mark an "X" through the center of both ends. You'll use these to center the piece on the lathe. If your "X" is off-center, you'll end up wasting a lot of material trying to make a cylinder, and probably split the wood or take off giant chunks as described above.

Step 2) Once you have the wood centered and attached to the lathe (again, there are steps here, but I'm trying to keep this relatively brief/simple), you attach your tool rest (a metal bar you place your chisel/knife against, which acts like a fulcrum) about 1/4" from the edge of the wood.

(Step 3) For my project, I was cutting spindles, but wanted to keep the ends of each square, so I cut a very shallow groove around the perimeter of the wood, about 1 1/2" from each end (see photo). If I hadn't done this, I likely would have splintered off a chunk on each end; cutting the groove helps keep the ends square. If you're going to turn the entire length of wood, this wouldn't be necessary.

Step 4) Next is the fun part - turning. Turn on the lathe (obviously). Place the tool firmly agains the tool rest and gradually move it toward the stock of wood, taking off bits/shavings of material very slowly. Proceed down the length of the material, cutting a little more with each pass, until you've turned a cylinder. Pretty easy, huh? It really is.

After that you can use all sorts of other chisels and knives with different ends to create different grooves and cuts in the spindle. For this project, I was given some general direction from the client, but they wanted each one to be different. This, combined with the "rustic" or "handmade" look they wanted, made the job incredibly easy. Typically I would sharpen my knives/chisels frequently, as well as sanding the piece with sandpaper from 60 or 80 grit all the way up to 600 grit or higher. I'd also wear a respirator, safety goggles and ear muffs (safety 1st!).

I should mention I've been doing this for a while now, but am nowhere near a pro. There are people who do this - and only this - type of woodworking as a passion, and produce some amazing things. With the exception of Christmas ornaments and baby rattles, turning is something I usually incorporate into a larger piece, rather than make as stand alone objects. If you want to see cool pictures of way better turnings, or learn more about the process, check out the Loess Hills Woodturners Club, a local club based out of Iowa. Of for more photos, check out the American Association of Woodturners.

Saturday, May 23, 2009

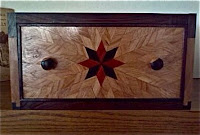
Jean's Drawers


Here's another recent addition I haven't had the opportunity to post yet. I designed and fabricated this and another similar drawer for my friend Jean, to be joined an existing table top she made from wood salvaged from the Falstaff brewery. 

The quilted look of the drawer fronts were accomplished by fabricating a series of small (1") diamond-shaped pieces of cherry and Spanish cedar together. This is very much the same process I used for the body of the "Ark" chair in my Share Your Chair blog. The center starburst is made of alternating pieces of cocobolo and redheart. The knobs are made turned from cocobolo and cherry. Though not really visible in these photos, the top and bottom are walnut veneered plywood; the sides are cherry and cocobolo. I finished it all off with a couple coats of semi-gloss polyurethane.